Lab 1 - Piece of Cake
Table of Contents
| Topic | Lab Type | Difficulty | Estimated length |
|---|---|---|---|
| Control Hub User Management Tasks | Practical Lab | EASY | 10 min |
| Contact Center User Configuration | Practical Lab | EASY | 10 min |
| Bulk Operations | Practical Lab | EASY | 5 min |
| Access to the Agent Desktop | Practical Lab | EASY | 10 min |
Overview of the lab
In this Lab, we will go through the Admin UI by completing the tasks required for the general pre-configuration of a tenant.
At the end of the lab, you should be able to log in to an agent interface with the configured user extension.
Introduction
Live Demo and Overview of Control Hub by Günter
Lab Objective
- This lab is designed to help you do the initial setup and configuration of the tenant.
- The lab contains multiple exercises on Control Hub (Admin Portal) to make you comfortable with the Webex Contact Center application.
Pre-requisites
Quick Links
| Server | URL | User ID |
|---|---|---|
| Control Hub | https://admin.webex.com | admin@sandboxname.wbx.ai |
| Contact Center Portal | https://portal-v2.wxcc-us1.cisco.com/ | admin@sandboxname.wbx.ai |
| Collab Toolbox | https://collabtoolbox.cisco.com/tools/sandbox | CCO ID |
| Agent Desktop | https://desktop.wxcc-us1.cisco.com/ |
1. Create your Sandbox
Steps:
-
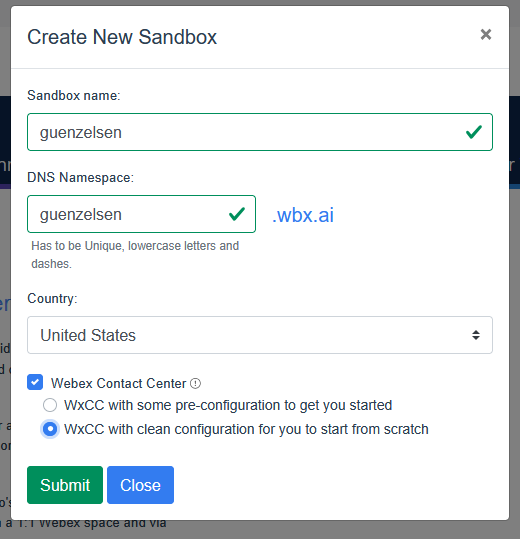
Login with your CCO ID to https://collabtoolbox.cisco.com/tools/sandbox and create a Sandbox
- Make sure to Select United States and the Webex Contact Center Checkbox.
-
If you select Germany, you will not be able to Use Cisco Calling Plans for PSTN Dial-In!
-
Choose the Option without the Pre-Configuration, you lazy bastard!
*
-
- Make sure to Select United States and the Webex Contact Center Checkbox.
-
Grab a beer 🍺
-
Check your Inbox and Webex App. After the Sandbox has been created, you will find you login information for the super-admin and site URL in the details and the E-mail.
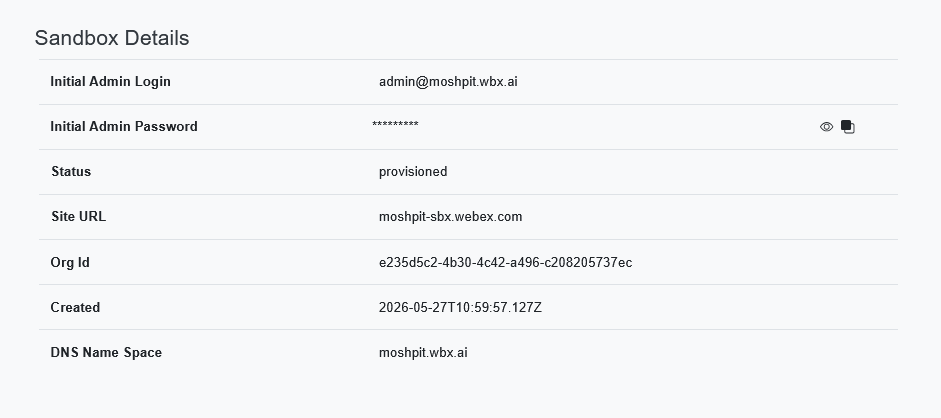
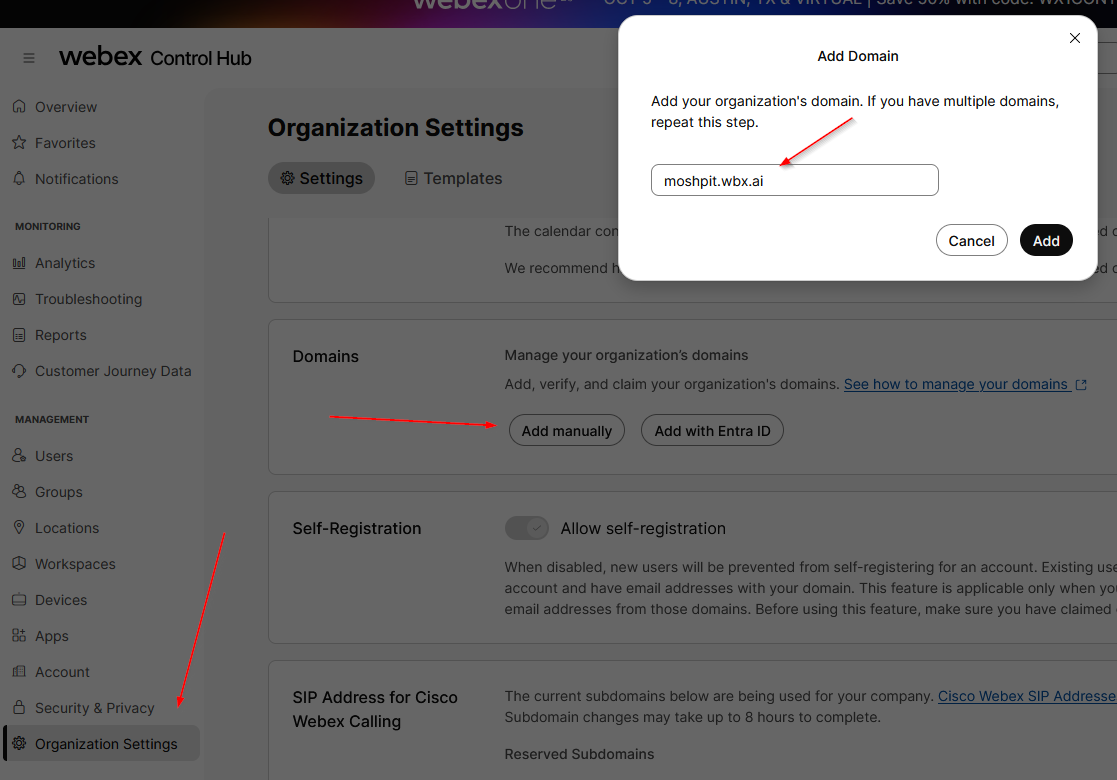
- Login with the admin to admin.webex.com and claim the Domain
- Go to Organization Settings -> Domains. Enter the Domain
- Retrieve the verification token and copy to clipboard
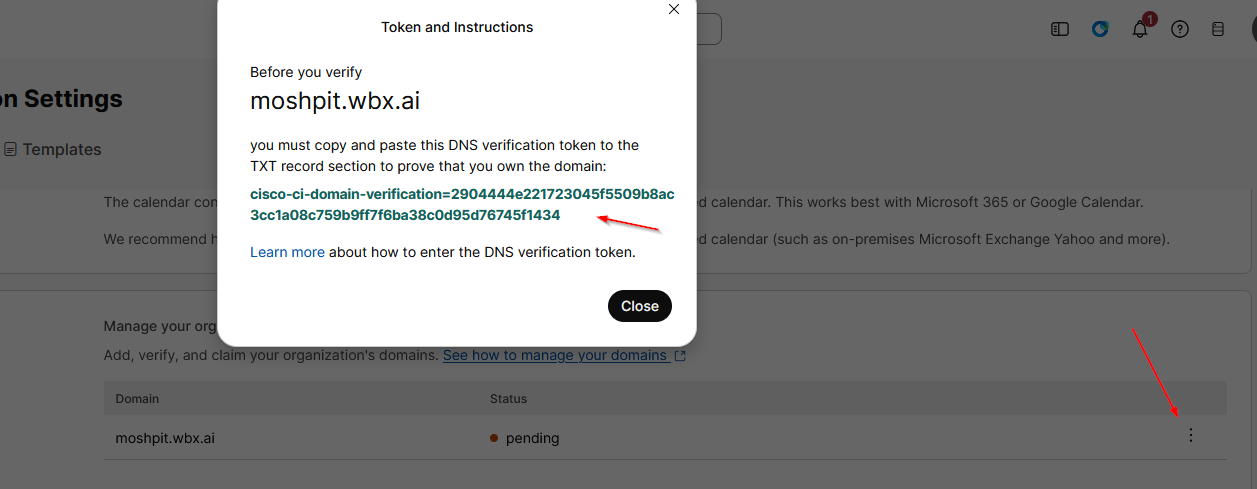
- Return to the Sandbox and create the DNS Record
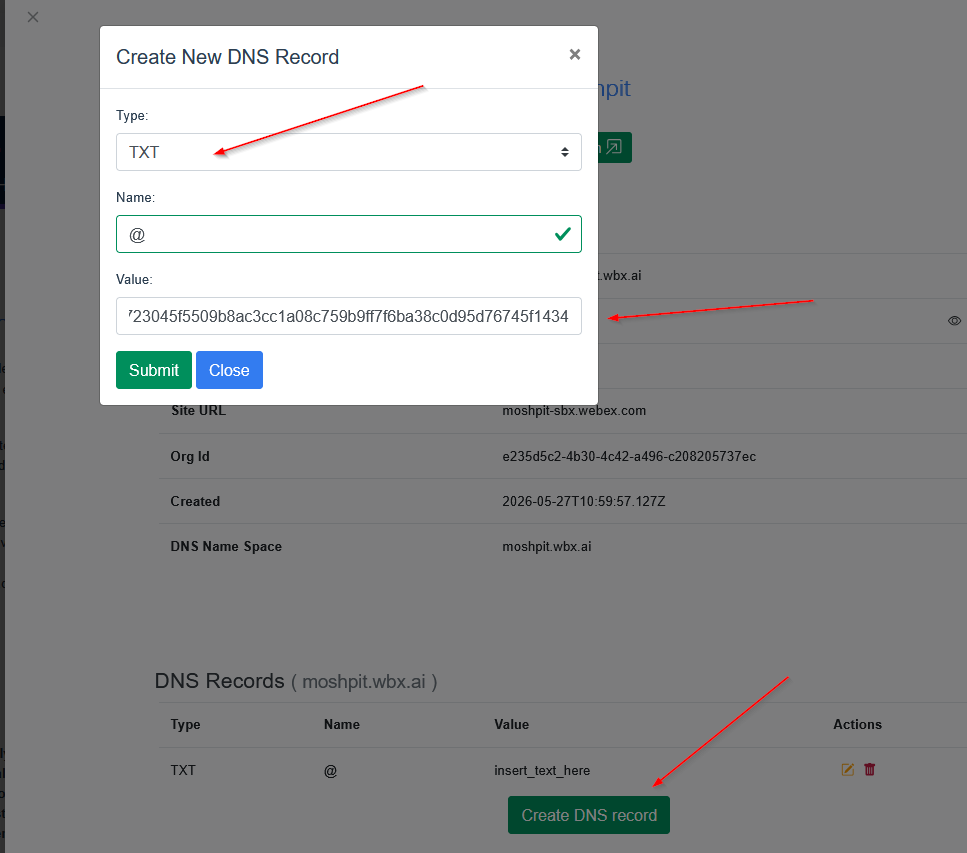
- Return to Control Hub and verify the Domain.
- Go to Organization Settings -> Domains. Enter the Domain
2. Add Numbers to Location
Your Sandbox comes prepared with one Site but you will need to order some Numbers.
Steps:
- Go to Locations -> Site 1 -> PSTN
- Select "Manage"
- Choose Cisco Calling Plans
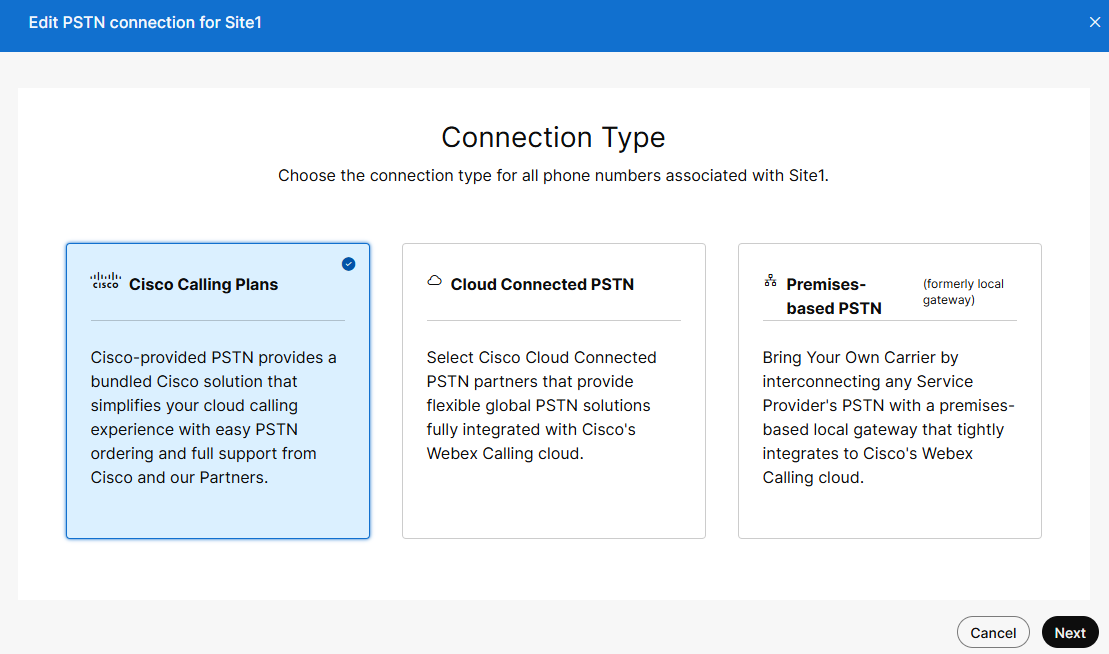
- Fill in some fake Information
- Choose 5 Numbers and your preferred Area Code to order some numbers
3. Add agent and supervisor users and set the calling extensions
| User Role | User email | Endpoint | Extension | Team |
|---|---|---|---|---|
| Admin | admin@yourlabname.wbx.ai |
N/A | N/A | |
| Agent 1 | agent1@yourlabname.wbx.ai |
WebRTC | 1001 | Sales |
| Agent 2 | agent2@yourlabname.wbx.ai |
Webex App | 1002 | Service |
| Supervisor 1 | supervisor@yourlabname.wbx.ai |
Webex App | 1101 | Sales, Service |
Steps:
- Login to Control Hub with the admin account.
- In the left navigation pane go to Users under Management.
- Click on Manage Users button.
- Select Manually add users.
- Set the agent's First name, Last name and input the Email addresses of the agent.
- Click on
+sign and add the supervisor in the same way. - For consistency, verify that the Email addresses are the same as in the table above and click Next.
- In Step 2: Assign license for users select Webex Calling (Professional) & Contact Center (Premium Agent).
- On the next page, make sure that the Location is selected under Assign Numbers. The correct value should be already selected by default.
- It may be that your Order is still in Processing. You ca left the Phone Number is as None and add it later
- On the same page, enter the correct
Extensionunder Assign Numbers. The correct extensions should be provided to you with the admin credentials. - In Step 4: Review verify the data and Click Add users.
- On the next page, you should get confirmation "2 users added". Confirm by pressing Close.
- Now select the supervisor user and modify his role to Premium Agent - Supervisor Role by clicking the Edit Licenses button in the Licenses section.
- Click Save and Close to confirm the changes.
- Validate the users by going to the email account. Open the Control Hub validation email and follow the Cisco Webex instructions to activate both accounts.
- Refresh the Users page in Control Hub. Make sure that both users are in Active status.
Contact Center User Configuration
| Entity | Name |
|---|---|
| Multimedia Profiles | MMP |
| Site | Technical Solutions |
| Team 1 | Sales |
| Team 2 | Service |
1. Create new Multimedia Profile
- Login with admin credentials to Control Hub at https://admin.webex.com.
- In the left pane navigate to Contact Center card.
- Click Settings in the upper menu.
- Scroll down in the left navigation panel to the DESKTOP EXPERIENCE section and click on Multimedia Profiles.
- Click on
Create Multimedia Profile. - Input Name as MMP.
- In the Media Details section, leave the Blended mode and input
1for Voice,3for Chat,3for Email,3for Social, then click Create in the lower right corner.
2. Create new Site
- Navigate to USER MANAGEMENT in the left navigation panel and select Sites.
- Click on
Create Siteand provide the Name as Technical Solutions. - Select your MMP in the Multimedia profile drop-down list and hit Create.
3. Create new Team
- Navigate to Teams under USER MANAGEMENT.
- Click on
Create Team. - Input Name as Sales.
- Select your site from the Parent Site drop-down.
- Select the team type
Agent Based. - Select your Multimedia profile.
- Leave the default value Global Layout in the Desktop layout drop-down and click Create.
Note: Have you tried adding agents although it is not mentioned? I know you have. That's good. Stay curious!
You may be wondering why the agents are not listed...hehe..there are different ways to add users to teams....
4. Activate the Contact Center Settings for the users
- Navigate to Contact Center Users under USER MANAGEMENT.
- Using Search, find your attendee ID and select the agent to launch the Edit view.
- Click on Contact Center Enabled toggle to move it to On.
- In the Agent Settings section, select your site in the Site drop-down.
- Click the Teams area and select your team.
- Select the default Agent-Profile in the Desktop Profile drop-down list.
- Choose the Multimedia Profile and hit Save.
- In the User's table make sure that the agent is now shown with the Contact Center Enabled flag as
Yesand Status asActive. - Repeat the steps above for supervisor.
Bulk Operations
In this section you will learn how to use Bulk Configuration in Control Hub by creating a second team. As an administrator, you can use Bulk Operations to create, modify, import, or export configuration objects in Webex Contact Center. This feature provides greater speed and efficiency to deploy and configure Webex Contact Center systems.
Bulk Operations are available for the following configuration object types:
| Entry Point | Auxiliary Code |
| Queue | Agent Profile |
| Outdial Entry Point | Address Book |
| Outdial Queue | Outdial ANI |
| Site | Skill Definition |
| Team | Skill Profile |
| Users | Entry Point Mappings |
| User Profiles | Audio Files |
| Work Types | Global Variable |
Create the second Team
- Go to Control Hub at https://admin.webex.com.
- In the left pane navigate to Contact Center card.
- Select Bulk Operations in the Webex CC navigation pane.
- Click Create Bulk Operations in the right upper corner.
- In Step 1 select the configuration object Team in the drop-down list.
- In the Export section enter MyTeam as the file name and click Next.
- Once the task is Completed, click Download export file under Action and open the csv file in a notepad.
- The first line is the headers; it is mandatory to have it during the import process. Remove all lines from the CSV file except the first line with headers and the line with Team1.
NAME,SITE,TYPE,MULTIMEDIA PROFILE,SKILL PROFILE,DN,CAPACITY,DESKTOP LAYOUT
Sales,Site1,AGENT,MMP,,,,Global Layout
- Rename the Sales to Service and save the file. You should have only 2 rows in the file.
Example:
NAME,SITE,TYPE,MULTIMEDIA PROFILE,SKILL PROFILE,DN,CAPACITY,DESKTOP LAYOUT
Service,Site1,AGENT,MMP,,,,Global Layout
- Go back to the Bulk Operations menu and click Create Bulk Operations again.
- In step 1, select the Team configuration object from the drop-down list and import the CSV file by dragging it into the Import section.
- Click Next and wait for the results. The status should be shown as Completed.
- Go to the Management Portal, click on Provisioning → Team and verify that Service is created.
- In the Management Portal, directly associate Service with your agent and supervisor by adding your users to that team (Advanced Settings → Agents).
Access to the Agent Desktop
By following the steps below, you will log in to the Agent Desktop with your credentials and indicate the number (DN) where you want to receive the calls.
The Lab Tenant is located in the US datacenter. It does not allow outbound international calls. If you have US numbers, you can use them to sign in as an agent or supervisor. Otherwise, please use WebRTC for the agent and download the Webex App for the supervisor according to the steps below.
1. Download and Login in the Webex app for PC or Mac
For the Lab Tenant you will need the Webex app for placing calls to the Entry Point and signing in as supervisor. Alternatively, if you have a US number, you can use it as the supervisor's extension. This tenant does not allow numbers outside of the United States. In this lab, we will use the Webex app on your PC or Mac for the supervisor account.
- Download the Webex app from https://www.webex.com/downloads.html.
- Install the application on your PC/Mac.
- Open Webex app and click Sign In. Specify the supervisor credentials.
2. Agent Desktop Login
Note: To log in to the agent desktop, use either a different web browser or a new incognito web page. This will prevent browser caching issues with admin and agent credentials.
Depending on your tenant's location, the agent URL link can be different. The example below is for the tenant in the US datacenter.
- Navigate to https://desktop.wxcc-us1.cisco.com/ in Chrome browser in incognito mode.
- Enter the agent's email ID which you created in the previous task.
- Enter the Password for the appropriate username.
- In the Station Credentials pane, select "Desktop".
- Select the team Sales.
- Click Submit. The browser may ask you to confirm use of the microphone.
- Make sure that you are successfully logged in to the Agent Desktop.