Lab 3 - Come get some
Overview of the lab
In this lab, we will go through the Agent Desktop portal use in daily basis. We will review how to complete some of the most common tasks, and some more advanced features will be introduced.
At the end of the lab, you should be able to handle calls as an agent, perform useful agent tasks, and create your customized Agent Desktop.
Table of Contents
| Topic | Lab Type | Difficulty | Estimated length |
|---|---|---|---|
| Agent Desktop Overview | Demo | EASY | 10 min |
| Basic Features | Practical Lab | EASY | 15 min |
| Custom Desktop Layouts | Practical Lab | MEDIUM | 30 min |
Introduction
Lab Objective
- Get an idea of the Agent user journey and familiarize yourself with the platform and some of the most useful features.
- Part 1: explain the different parts and possible functions of the Agent Desktop interface.
- Part 2: learn basic functions an agent performs — handle incoming calls, make outdial calls, configure some User Profile settings.
- Part 3: customize the Horizontal header of the platform and add custom widgets to the Navigation bar.
Pre-requisites
- You need to have Webex App installed in your laptop or mobile phone to place calls. You will also need an extra device (e.g. your personal phone) to test Consult and Conference.
- Complete Lab 1: Control Hub and Admin Portal.
- Complete Lab 2: IVR Contact Routing.
- For Part 3 — Custom Desktop Layout, you should have a Webex Contact Center Analyzer Report (stock or custom). See: How to create an Analyzer Report.
Quick Links
- Control Hub: https://admin.webex.com
- Portal: https://portal.wxcc-us1.cisco.com/portal
- Agent Desktop: https://desktop.wxcc-us1.cisco.com
- Developer Portal: https://developer.webex-cx.com
- API Samples: https://github.com/CiscoDevNet/webex-contact-center-api-samples
- Widget Samples: https://github.com/CiscoDevNet/webex-contact-center-widget-starter/tree/master/Examples
Submit the form on the original site with your Attendee ID. All configuration items in the lab guide will be renamed with that prefix.
Attendee ID: __________
Agent Desktop Overview
Station Login
-
Access Agent Desktop via the Management Portal (Desktop module) or directly:
https://desktop.wxcc-<DC>.cisco.com/ -
Enter agent credentials.
-
Based on the Voice Channel Options set at the agent's Desktop Profile, telephony options are:
- Dial Number: E.164 phone number where the agent will receive incoming and outdial calls.
- If admin configures the default DN, it's prepopulated in Dial Number and Extension fields.
- If admin restricts DN to default, you can't edit it.
- Check International Dialing Format to choose a country code.
- Extension: Internal extension where the agent receives calls (valid when using Webex Calling or a softphone).
- Desktop: The new WebRTC option, allowing inbound/outbound calls through the internet without any phone or softphone.
- Dial Number: E.164 phone number where the agent will receive incoming and outdial calls.
-
Select one of the possible teams from the list. Agents can belong to multiple teams but can only receive calls for one team at a time.
-
Check Remember My Credentials to save station credentials.
-
Agents can't access Agent Desktop from multiple browsers/tabs at the same time.
Agent Desktop Interface
The Desktop UI language is based on the language preference set in your browser. Supports 29 languages including German, English (UK), English (US), French, Italian, Spanish, etc.
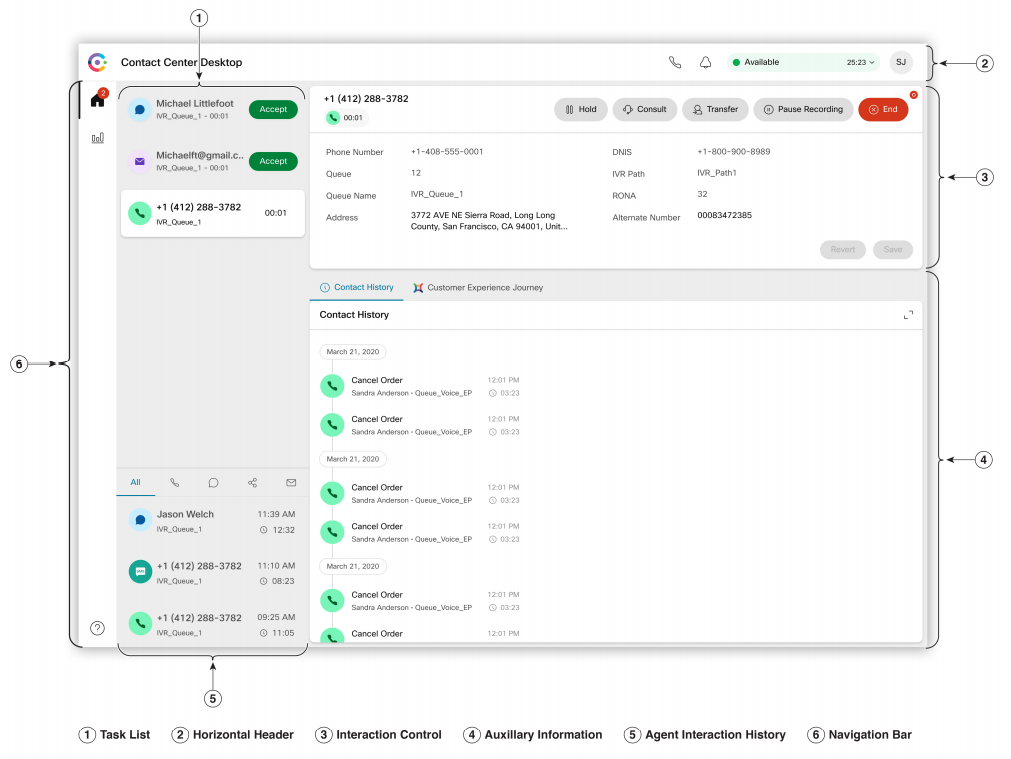
The Agent Desktop is divided into 6 sections:
- Task List: When a request is routed to your queue and you're Available, a new request appears here. Accept the request to start communication with the customer.
- Horizontal Header: Title and logo, Agent availability state, Notification Center, Outdial, User Profile.
- Interaction Control: When you accept a voice call, this pane is expanded. Includes customer info (CAD variables), timers, and call control buttons (Record, Hold, Transfer…).
- Auxiliary Information: Displays details based on contact card selection. For voice it shows customer contact history. For digital channels it shows the conversation and lets you send messages.
- Agent Interaction History: Previous contacts across all channels for the last 24 hours.
- Navigation bar: By default Home, Agent Performance Statistics, Help. Can be customized with additional icons/widgets.
Calls Handling
Agent states:
- Available: Ready to accept routed requests.
- Idle: Signed in but not ready to accept routed requests. Default idle reason set by admin.
- RONA (Redirection on No Answer): You did not accept a request within the specified time. State automatically changes to RONA; the request returns to queue.
- Engaged: Busy and connected with a customer. Becomes Engaged - Available; selecting Idle becomes Engaged - Idle.
Manage Voice Calls:
- CAD variables: Admin-configured variables that collect call data (e.g. case number). Can be made editable.
- Hold/Resume: Put customer on hold; click Resume to take off hold.
- Pause/Resume Recording: Per-Queue recording setting; agent can pause/resume.
- End: Best practice is to ask the customer to end; agent can end too. Wrap-up codes are then required.
- Consult: Initiate a consult call with another agent while on an active call.
- Transfer: Transfer the call to another agent, queue/EP, or DN.
- Agent / Queue / DN options available.
- Conference: Three-way conference between you, customer and another agent. Initiate via Consult, then Transfer to consulting agent. Consulted agent can Exit Conference; primary continues with customer. Only the primary agent can end the conference.
- WebRTC only:
- Mute/Unmute — silence yourself.
- Keypad — insert digits during a call.
Basic Features
| Entity | Name |
|---|---|
| Agent 1 | wxcclabs+agent_AttendeeID@gmail.com |
| Supervisor 1 | wxcclabs+supvr_AttendeeID@gmail.com |
| Desktop Profile | AttendeeID_desktopProfile |
| Entry Point | AttendeeID_EP |
| Queue | AttendeeID_Q |
| Team 1 | AttendeeID_team1 |
| Team 2 | AttendeeID_team2 |
| Outdial ANI | AttendeeID_outdialANI |
| Outdial ANI Entry 1 | AttendeeID_outdialANIEntry1 |
| Address Book | AttendeeID_addressBook |
| Address Book Entry 1 | AttendeeID_addressBookEntry1 |
| Multimedia Profile | AttendeeID_MMP |
NOTE: Please create all tenant entities following this naming convention. Entities that don't match attendee IDs will be deleted.
Testing Incoming call
If you're using the shared lab tenant, complete the lab using Desktop (WebRTC) telephony option.
If you're using your Gold Tenant, be aware that WebRTC only works with RTMS media stack. Firefox is not supported.
- Ensure all call handling options are enabled.
- Login as admin to Control Hub → Services > Contact Center > Settings > Desktop:
- Make sure End Call and End Consult are enabled.
- Configure Auto Wrapup and RONA timeouts.
- Open Management Portal → Provisioning > Desktop Profiles and edit your Desktop Profile:
- In Collaboration tab: Set Buddy Teams to
All, enable Consult to Queue. - In Voice Channel Options tab: enable Dial Number, Extension, or Desktop.
- In Collaboration tab: Set Buddy Teams to
- Provisioning > Queue — edit your Queue:
- Enable Permit Recording, Record All Calls and Pause/Resume.
- Ensure tenant-level recording is enabled.
- Set Recording Pause Duration.
Test:
- Login Agent Desktop with your Agent1 user.
- Select Desktop as telephony option.
- Under User Profile > User Settings, click Speaker and Microphone to set them.
- Click Test Your Network under Help.
- Go Available.
- Make a call to the DN mapped to your EP (use Webex App enabled for your Supervisor user or your personal phone).
- Accept the call from the Agent Desktop:
- Check CAD variables and try to edit any Global Variable.
- Change to Engaged - Idle so you don't receive digital requests.
- Play with interaction buttons:
- Hold / Resume
- Pause Recording → say something personal → Resume
- Transfer → select Welcome_EP (end customer redirected to a common EP)
- End the call and select Wrap-up code
For this part, you will need a third calling device for interacting as a Supervisor.
- Using a different browser, login as Supervisor → make Available.
- On a separate device login Webex App with the Supervisor user.
- Place call from the third device.
- Try Consult, Conference, Transfer between End Customer, Agent, Supervisor.
Exploring User Profile
- Change Team:
- Navigate to Management Portal > Provisioning > Teams — find your Team 2 → Edit.
- Make sure there is no Multimedia Profile at user level (user settings have preference over team settings).
- Change Team 2's Multimedia Profile from
AttendeeID_MMPtoDefault_Telephony_Profile.
- Login Agent Desktop selecting
AttendeeID_team1:- Check Channel Capacity in User Profile.
- Click your Team → dropdown shows available Teams → pick
AttendeeID_team2→ Save Team Selection.
- Notice notifications appearing in Notification Center; you can disable them or sound; mark as Read.
- Check Channel Capacity again — it's different.
Test additional options:
- Switch to Dark Mode
- Keyboard shortcuts
- Download error log
Outdial
- Navigate to Management Portal > Provisioning > Outdial ANI → New:
- Name:
AttendeeID_outdialANI - Entry:
AttendeeID_outdialANIEntry1— Number: your mapped DN
- Name:
- Provisioning > Address Book → New:
- Name:
AttendeeID_addressBook - Parent Type: Site
- Entry:
AttendeeID_addressBookEntry1— international calls disabled, US numbers only. e.g.+18662293239(Cisco Helpdesk).
- Name:
- Provisioning > Desktop Profiles:
- Edit your Desktop Profile — make sure Outdial is enabled and Outdial Entry Point-1 selected.
- Select your Outdial ANI.
- Management Portal > Tenant > Settings — note the Default Outdial ANI.
This is a required setting at tenant level — DO NOT EDIT IT.
-
Login Agent Desktop with Agent1 (Webex Extension):
- Open Outdial on Horizontal Header → input your personal phone number → do not select an Outdial ANI → click telephone button. The call comes from the Default Outdial ANI defined at tenant level.
- Repeat but select your Outdial ANI — the call comes with the different ANI.
-
Switch to Address Book tab → see entries → call any number.
Custom Desktop Layout
Basic JSON elements
Top-level properties:
appTitle: Title on the horizontal header. DefaultWebex Contact Center.logo: URL for the company logo.taskPageIllustration: Custom illustration for the task page background.stopNavigateOnAcceptTask: Whether to shift focus to a newly accepted task. Defaultfalse.dragDropEnabled: Drag-and-drop / resizing of widgets on custom pages. Defaultfalse.notificationTimer: Duration (seconds) after which desktop notifications auto-dismiss. Default 8. Range 1-10.maximumNotificationCount: Number of notifications shown at once. Default 3. Range 1-10.browserNotificationTimer: Duration (seconds) after which browser toaster notifications auto-dismiss.wxmConfigured: To configure Webex Experience Management; defaultfalse.desktopChatApp: Configure Cisco-offered chat applications (e.g. Webex App).webexConfigured: Embed Webex App (messaging/calling/meetings) inside Desktop.headerActions: Order of icons on the horizontal header. Default:["webex", "outdial", "notification"].area: Core section — define layout per area.
Personalize the title and logo
Video walkthrough on the source site shows the desktop layout customization process.
- Login to https://portal.wxcc-us1.cisco.com with admin credentials.
- Navigate to Provisioning → Desktop Layout.
- Click New Layout → Click Download to download
Default Desktop Layout.json. - Open the JSON file in a text editor.
- Modify
appTitleto your company name. - Modify
logoto your logo URL or use:
https://raw.githubusercontent.com/wxcctechsummit/holcct2100/main/labslive/CiscoLiveLogo.jpg - Modify
wxmConfiguredandwebexConfiguredto true to enable standard widgets. - Save As JSON with a distinguishable name.
- Back in Desktop Layout → New Layout:
- Name:
AttendeeID_desktopLayout - Select
AttendeeID_team2as Team - Upload modified JSON
- Save
- Name:
- Login Agent Desktop → User Profile → change Team → Save Team Selection → confirm.
- See the new logo, title, and out-of-box widgets (Webex & Custom Experience Analytics).
Reorder components of Horizontal Header
- Use the same desktop layout file. Ensure layout version is 0.0.7 or higher.
- Under
advancedHeader, change the order of components. - Save and upload, log in / refresh Agent Desktop.
Create iFrame Widget & change default landing page
- Take the default desktop layout file.
- Create a section under
navigationsimilar to Customer Experience Analytics. Sample: Analyzer_iFrame_Widget.json. - In the new section, add
label,icon, andisDefaultLandingPage: true. - Set
srcto your analyzer report URL. - Save and upload — login / refresh.
Populate Custom Widget with desktop parameters
A Custom Widget is a component with specific encapsulated functionality, exported as a custom HTML element placed within the desktop.
STORE keys available:
- STORE.agent: Desktop profile info and settings.
- STORE.agentContact: Agent tasks and interactions.
- STORE.app: Company logo, title, dark mode.
- STORE.auth: Authentication token for SSO.
- STORE.generalNotifications: Application notifications.
- STORE.dynamic: Connector (smaller) or Desktop (larger) view area.
Developer guide: https://developer.webex-cx.com/documentation/guides/desktop/#custom-widgets
Sample widgets repo: https://github.com/CiscoDevNet/webex-contact-center-widget-starter/tree/master/Examples
JavaScript SDK and Modules
The Desktop JavaScript SDK is an npm package that lets you request up-to-date information from the Desktop (agent details, tasks, locale, SSO auth token, etc.).
- Install:
npm install @wxcc-desktop/sdk --saveoryarn add @wxcc-desktop/sdk - Import:
import {Desktop} from "@wxcc-desktop/sdk"; Desktopis the root module; sub-modules:- Configuration Module
- Localization Module
- Actions Module
- Logger Module
- Agent State Information Module
- Agent Contact Module
- Dialer Module
- Screen Pop Module
- Shortcut Key Module
- Call Monitoring Module
- Full guide: https://developer.webex-cx.com/documentation/guides/desktop#javascript-sdk-and-modules
Congratulations, you have completed this lab! Continue with Lab 4 — Supervisor Desktop.